Posts

Azure SQL Managed Instance Database Query.

The below piece of code is explaingin about Azure SQL Managed Instance backup status. However this can be taken care by Azure internally. SELECT TOP ( 30 ) bs.machine_name, bs. server_name , DB_NAME(DB_ID(bs.database_name)) AS [ Database Name], bs.recovery_model, CONVERT ( BIGINT , bs.backup_size / 1048576 ) AS [Uncompressed Backup Size (MB)], CONVERT ( BIGINT , bs.compressed_backup_size / 1048576 ) AS [Compressed Backup Size (MB)], CONVERT ( NUMERIC ( 20 , 2 ), ( CONVERT ( FLOAT , bs.backup_size) / CONVERT ( FLOAT , bs.compressed_backup_size))) AS [Compression Ratio], bs.has_backup_checksums, bs.is_copy_only, bs.encryptor_type, DATEDIFF ( SECOND , bs.backup_start_date, bs.backup_finish_date) AS [Backup Elapsed Time (sec)], bs.backup_finish_date AS [Backup Finish Date ], bmf.physical_device_name AS [Backup Location ], bmf.physical_block_size, * FROM msdb.dbo.backupset AS bs WITH (NOLOCK) INNER JOIN msdb.dbo.backupmediafamily AS bmf WITH (NOLOCK) ON bs.me

Moving the table to new file group in SQL Server

Image
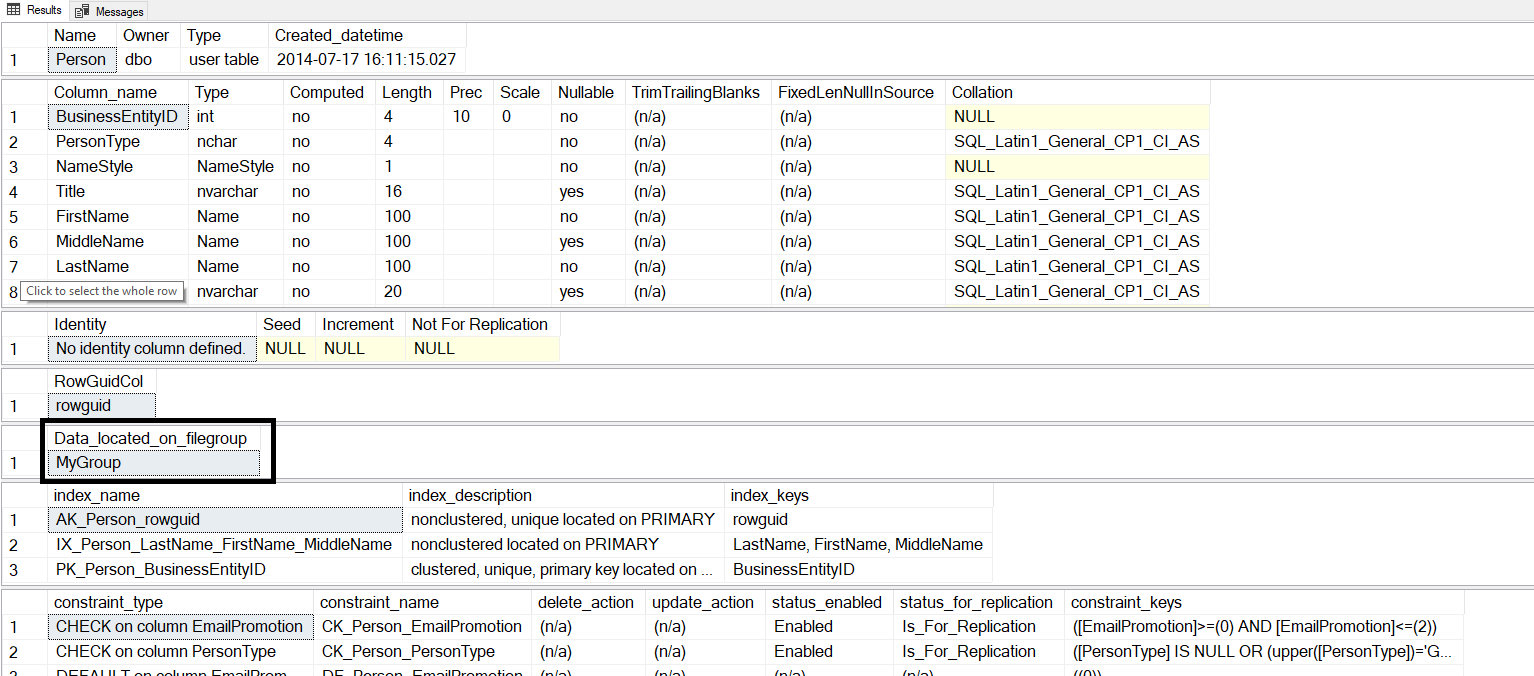
The below link will explain how to move table from one file group to another file group. How to move table from one filegroup to another After the link opens search with the below text to go to the respective topic. D. Dropping a clustered index online and moving the table to a new filegroup. In the below example I am moving Person.Person table to new file group and new data file and new drive. USE master go ALTER DATABASE [AdventureWorks2014] ADD FILEGROUP MyGroup go ALTER DATABASE [AdventureWorks2014] ADD FILE (NAME = 'MyDataFile_Data' , FILENAME = 'G:\AdventureWorks\NEWFILEGROUP\MyDataFile_data.ndf' ) TO FILEGROUP MyGroup GO /* The below piece of code will move the table from pirmary to newly created file group called "MyGroup". And in this piece of code "UNIQUE" is compusory However this is not referring to UNIQUE index. This command may throw an error if the table has "XML" indexes.Scriptout those tables drop it and rec

Install-dbaInstance,dbatools

Image
The below piece of code from dbatools PowerShell module will insall SQL Server installation. Install-DbaInstance ` -SqlInstance RAMESH\UAT ` -Version "2016" ` -InstanceName "UAT" ` -SaCredential "sa" ` -Feature Default ,Tools ` -InstancePath "D:\RAMESH_UAT\DATA" ` -DataPath "D:\RAMESH_UAT\DATA" ` -LogPath "G:\RAMESH_UAT\LOG" ` -TempPath "D:\RAMESH_UAT\TEMPDB" ` -BackupPath "D:\RAMESH_UAT\BACKUP" ` -AdminAccount "RAMESH\HI" ` -Port 1433 ` -ProductID "13.0" ` -EngineCredential "RAMESH\HI" ` -AuthenticationMode Mixed ` -Authentication Default ` -AgentCredential "RAMESH\HI" ` -SaveConfiguration "D:\RAMESH_UAT\BACKUP" ` -Verbose ` -Path "D:\SoftWares_NEVERDELETE\SQLServer\SQLServer2016Enterprise\SQL_Server_2016_Enterprise x64" ` -Debug

OSTRESS

Image
 "OSTRESS" is one of the RML Utilities ( RML Utilities or RML Utils ) with which we can estimate the load on the pressure. However I am not going to explain this feature in detail just adding the command how to run it. Before we run the below command we need to download RML Utilities and can start working with it. Here I am explaining about OSTRESS. You need to run this in the "CMD" not in PowerShell. 1) Install RML Utilities 2) Chnage teh directory(CD) to that path or folder  where you install RML utilities. 3) -n30--> 100000 Connections parallelly run the same query 100000 times which mean one connection will run 100000 queries, here the query is same.

How to download script or modules from GitHUB.

Image
The last portion will shows us the user or author name and module for instance see the image below. git clone https : //github.com/Stephanevg/PSHTML.git

How to make server not go into LOCK mode continuously

Image
If we make the changes below in " gpedit.msc " from run command. The system will NOT GO into lock mode. The below changes I made it in Windows Server 2012 R2. 1) Go to run command and pass value as "gpedit.msc" and follow the path below. 2) Computer Configuration-->Administrative Templates-->System-->Power Management-->Video and Display Setting-->Turn off the display(plugged in) and make the change below.

How to create an SQL Server Alias name and how to connect it from another SQL Server which is on another Windows Server

Image
  I have two sql server nodes NODE1 and NODE2 and I am creating an alias for NODE2 default sql server instance and want to give an alias name as myNode2. Follow the procedure below. 1) Connect NODE2 windows server and open SQL Server Configuration Manager and go to "SQL Native Client 11.0 Configuration" and under which you can find "aliases" Right click and new alias and the below window will pop up. Provide the values as below for the parameters and click on apply and after that ok. Alias Name: myNode2 Port No: 1433 Server : NODE2 Now you could see the value like below from SQL Server Configuration Manager. Try to create the same from "SQL Server Network Configuration(32Bit)" and "SQL NativeClient 11.0 Configuration" side too.  Then only you connect from SQL Server Management side by providing the alias name.  Please notice below image. Now try to connect to the myNode2 alias name which indirectly routing to NODE2 sql server default instance f

Wait on the Database Engine recovery handle failed. Check the SQL Server lof for potential causes.

Image
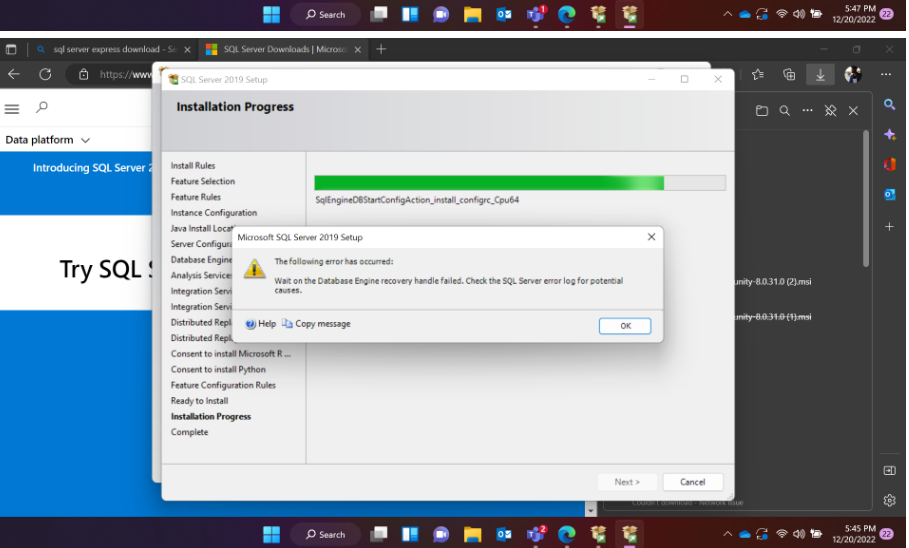
  I got the error below when I try to install SQL Server 2019 Evaluation Edition on Windows 11 client machine and with only single C drive . There are no other drives except C drive. And the below Powershell commands fix the issue. New - ItemProperty - Path "HKLM:\SYSTEM\CurrentControlSet\Services\stornvme\Parameters\Device" - Name "ForcedPhysicalSectorSizeInBytes" - PropertyType MultiString - Force - Value "* 4095" Get - ItemProperty - Path "HKLM:\SYSTEM\CurrentControlSet\Services\stornvme\Parameters\Device" - Name "ForcedPhysicalSectorSizeInBytes" And the image looks like below. After making above changes, Uninstall existing SQL Server instance and restart Windows Client machine(Operating System 11) and again install SQL Server from the scratch and try to connect. This time it should connect now.

Error : Your host does not meet minimum requirements to run VMware workstation with hyper-v or device/credential guard enabled (76918)

Image
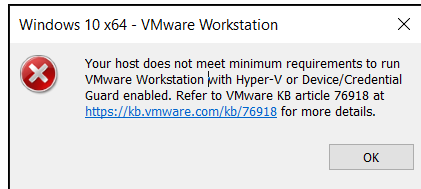
Recently I have installed Docker in my Windows 10 pro system. Before that I also have VMWare Work station installed in my machine too. After couple of days working on Docker I have un installed it and start work on VMware Work station. At that time I got the error below when I try to open already installed VM in VMWare work station.  1) I already removed the feature Hyper-V from "Turn Windows feature On/Off" from my system. Bu even after that we are able to see the same error. Then I open command prompt in run the below commands which fix the issue and allow to run VM smoothly. The commands are below: I have already run this so I could see "The Operation completed successfully". If you would have run you may see in the beginning that you could see the " hypervisorlaunchtype AUTO ".  When you run "bcdedit /set hypervisorlaunchtype off". The status of  hypervisorlaunchtype would change to OFF from AUTO.   Please find the observations below. bcdedit

Configuring SQL Server Reporting Services(SSRS) on Always On Availability Groups(AOAG)

Image
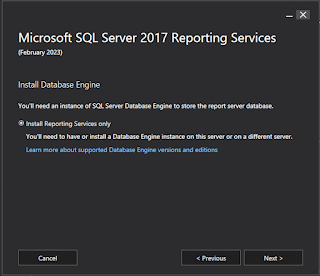
I am configured SSRS on Always on Environment. Here I have NODE1 and NODE2 servers, NODE1 is primary replica and NODE2 is secondary replica. I have installed SSRS on both the nodes after downloading setup file from the internet. The below images will explain about how to configure things from "SSRS Configuration Manager". Images below are self explanatory.